How to update the volunteer docs
We have a documentation site on how to volunteer (you’re currently on it). Everyone can edit or add to this documentation (even competitors), this page gives you some tips on how to do so.
Editing a page in GitHub
Let’s say you’ve spotted some bad grammar on this page, and you want to make an edit to fix it.
These pages are stored in GitHub on the volunteer-docs repository. This is where you should go to make your changes.
To make your changes you need to be logged in on GitHub, if you don’t have an account you should sign up to GitHub.
- All content is available in the content folder.
- All images/extra files are in the static folder.
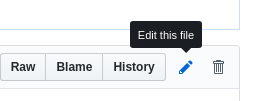
All pages are stored as markdown files (ones ending in .md). Once you’ve found the file for the page you want to edit (updating-volunteer-docs.md in this case), simply open the file, then click on the little pencil in the top-right corner to start editing. If you don’t know how to edit markdown and/or you find the GitHub editor is limiting you, we recommend you edit the files in typora, which is a WYSIWYG editor (like Microsoft Word).
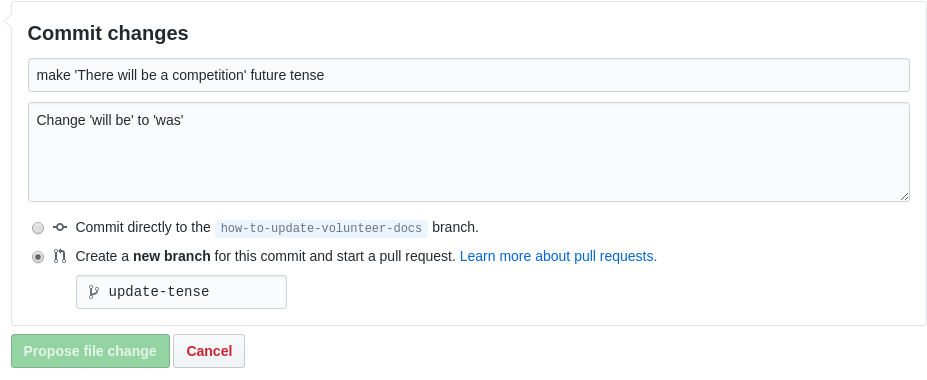
Once you’ve made your edit, scroll to the bottom and write what you changed in the ‘Commit changes’ box. Then pick a branch name, this should just be a summary of your changes in a shortened form, spaces aren’t allowed. Once you’ve done this, click the ‘Propose file change’ button. This will take you to the ‘Open a pull request’ page, (see the ‘Creating a pull request’ section below).
Creating a pull request
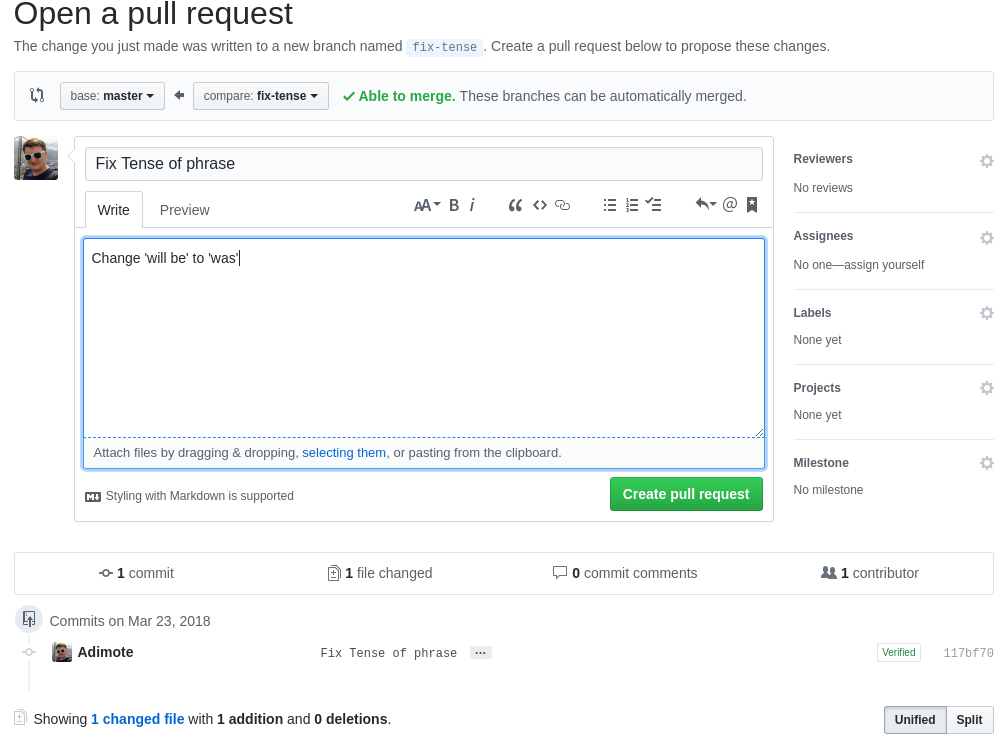
Once you’ve clicked the ‘Commit Changes’ button in GitHub, or if you’ve just pushed a change manually, you can open a pull request.
A pull request is a request for changes to be ‘pulled’ into the main version of the website (aka the master version).
The text should automatically be filled out for you, so as long as it makes sense, click the ‘Create pull request’ button. This will request for people to take a look at your changes and review it.
Pull request checks
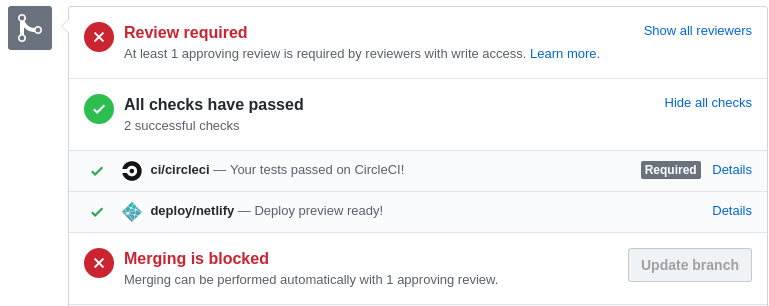
There are also a few checks which run when you create a pull request, these show up at the bottom of the page a minute or to after you’ve made a pull request. click ‘Show All checks’ to see all of them. These checks include:
- Checking Spelling and links (CircleCI checks)
- A sample version of the website is generated (Netlify checks)
If the CircleCI check fails, click on the ‘Details’ link to see what is broke (ask for help in the comments on if you don’t know what is broken or how to fix it. Errors tend to be a bit cryptic)
It’s a good idea to check what your website looks like by clicking on the ‘Details’ of the Netlify check. It will take you to a specially generated version of the site with your changes. You can then look for any obvious errors.
Troubleshooting errors
There are a few checks which run on the code, what follows is a quick summary of the most common errors and how to fix them:
‘Spelling errors found’: We have a spell checker, this is great for catching typos, but has quite a high false-positive rate. If you’re certain you’ve spelt the word highlighted in red correctly, you can add it to the .spelling file (if using GitHub, use the drop-down in the top left corner to select your branch before you make changes! This means it will update the pull request with your new change.)
‘N broken’ broken links: We have a checker for broken links, this means one of the links you added was broken, but sometimes means that a site we have previously linked to has just gone down. If you didn’t add the link, comment the fact then ignore it.
Review process
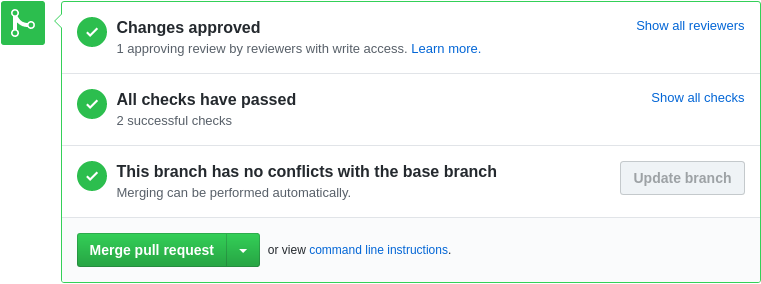
Once you submit a pull request, it is then sent for review by us. If you know a specific person who should take a look, you can add them in the dropdown on the right, otherwise someone will pick it up when they’re free. We will then comment on your changes, or if it seems fine we will approve it. Once it has been approved you can then click on the big green ‘Merge pull request’ button which will update the main website with your changes! After this you should click the ‘Delete branch’ button to clean up the branch you made.